I received an email the other day that I wanted to share:
| Hi Nan, Just wanted to say a big thank you for your website, and excellent articles. I am adult beginner on the cello, although have played the flute for 20 years. My grandad left me some money when he died and as I have always wanted to play the cello I thought I would get one. It's such a wonderful instrument although for four or so months I feel very much like a fish out of water. My bowing technique is what I need to work on most at the moment (not the only thing, of course!). So I wanted to say thank you for your excellent blog posts on bowing. My teacher is good but sometimes I feel like the 'why' and 'how' bits are left out. So for example, I asked about how to bow (eg. what is the arm movement and where does it come from) and he just told me to relax my arm - of course, you need a relaxed arm, but I needed some more help. I am also trying to finally get a natural thumb position with my bow holding hand. Your zombie post makes absolute sense, but my hand still doesn't feel comfortable -hoping it can be achieved with small hands. I will keep on trying and am going to see if my teacher can help me fit one of the cello grips (like the cellophant). I'm in my 20s and I am having great fun with my 74 year old friend who has just taken up the violin. Our duets are quite a laugh, although maybe not so for the poor neighbors! Thank you once again. |
Many of us can relate to the bow issue this cellist described. The concept of a relaxed bow hand/arm is one thing, but putting it into practice...
...and making it feel easy...
...while making a decent sound...
...is a whole other struggle altogether!
Here are a few exercises to help normalize the feel of the bow and the motion of the right arm so you can eventually forget about it.
Mostly.
...and making it feel easy...
...while making a decent sound...
...is a whole other struggle altogether!
Here are a few exercises to help normalize the feel of the bow and the motion of the right arm so you can eventually forget about it.
Mostly.
Ricochet and Tapping
These exercises, developed by my cello guru, Martha Gerschefski, are so sneakily helpful. They provide tons of time for you to focus on holding the bow without the pressure of making a good sound. This is a big deal, since our need to make a good sound can sometimes take precedence over an ideal bow interface--and we end up learning a hand/arm action that isn't ergonomic at all.
RICOCHET BOW
Keep in mind this will not sound good at all!
RICOCHET BOW
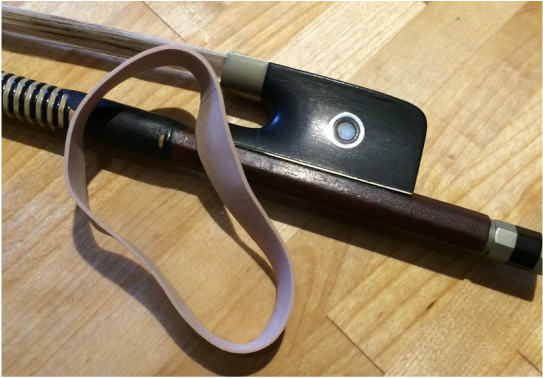
- Holding the bow normally, place it on a middle string about 3/4 the way to the tip (in the upper part of the bow)
- Grab the bow stick about 1/4 of the bow length from the tip with your LEFT hand (both hands are on the bow now)
- Use the left hand as a stabilizer while you set your bow hand.
- Let go with your left hand and twist your forearm outward (keeping wrist rigid) to lift the tip of the bow off the string
- Let the bow fall back down and bounce on the string like a ball until it stops on its own (repeat, since it will not work well at first)
- "Fix" your bow hand (as in Steps 1-3) as often as possible, since the bow will feel like sliding out of the hand
Keep in mind this will not sound good at all!
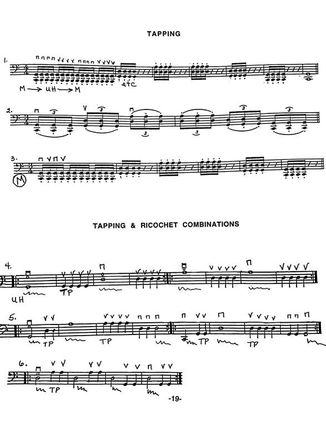 An excerpt from Martha's The Start
 TAPPING BOW
This will be the same as RICOCHET, except you will control the bow with your bow hand in between bounces to make specific rhythm patterns with the hits (do not try to make this sound good!)
Both of these exercises, and combinations of the two, are going to give you lots of training time with an ergonomic bow hand, so it should soon become more comfortable.
Want more exercises like these?
Order Martha's Strong and Flexible Bow for the Cello!
Table Glides
 We don't naturally do straight lines!
 As far as the "how to bow" issue is concerned, the main problem I see the most often is crooked bowing. To clarify: If left unchecked, the bow will naturally make a motion in the arc of a smile across the strings. Blame it on our physiology! (For some reason, evolution hasn't provided more cello-playing adaptations. )
To complicate matters, students will move their arms in complex and stressful ways in order to fix the crooked bowing.
I have found that the best way to counteract all of this is with an exercise I call "table glides." Again, it focuses on training the relaxed motion of the arm without any sound-production distraction.
This is adapted from Martha's exercise, Piano Glides.
TABLE GLIDES
- Sit or stand at the straight edge of a table or counter so it is at about waist height
- Place your fingers on the top edge of the table right in front of your navel. Be sure they are lined up on the edge and that you are touching the table with the tips of your fingers. Your wrist should curve inward to keep your fingers on the edge in this position (see photo 1)
- Curve your fingers enough so your curved and relaxed thumb can lightly run along the outside edge of the table top (see photo 2)
- Pull your arm outward from your body with your elbow and then follow the edge of the table with your fingers. Keep them all lined up on the edge and stop when you can't move outward any further (this is the feeling you should have at the tip of the bow).
- Then swing your arm back inward, keeping fingers along the edge again.
- REPEAT many times a day until your body gets trained to make this feeling occur even when you are holding the bow
 Photo 1: Wrist in when hand is in front of you | 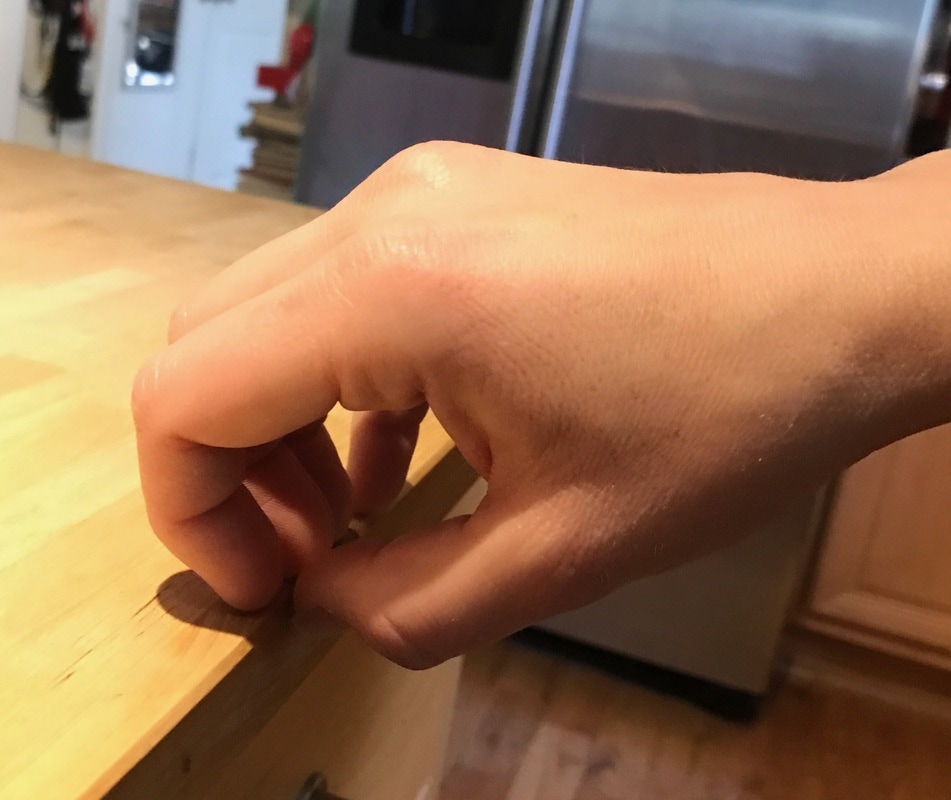 Photo 2: Thumb along outside edge This shows you all the bends and angles that are needed to draw the bow in a straight line (something we don't naturally do!). Repeating these exercises can train your body well without your having to get too cerebral about it. |
When these exercises start feeling easy, you can move on to putting the bow to the string--just keep in mind that you will have to keep checking on the motion in order to keep training it effectively.
Do not get distracted by the sound! That will get better eventually...
Do not get distracted by the sound! That will get better eventually...
I hope these exercises help you in your quest for a more ergonomic and relaxed bow interface!
Please leave any feedback or tips for your fellow cellists in the comments section below.
Happy Tapping!
Please leave any feedback or tips for your fellow cellists in the comments section below.
Happy Tapping!

 RSS Feed